
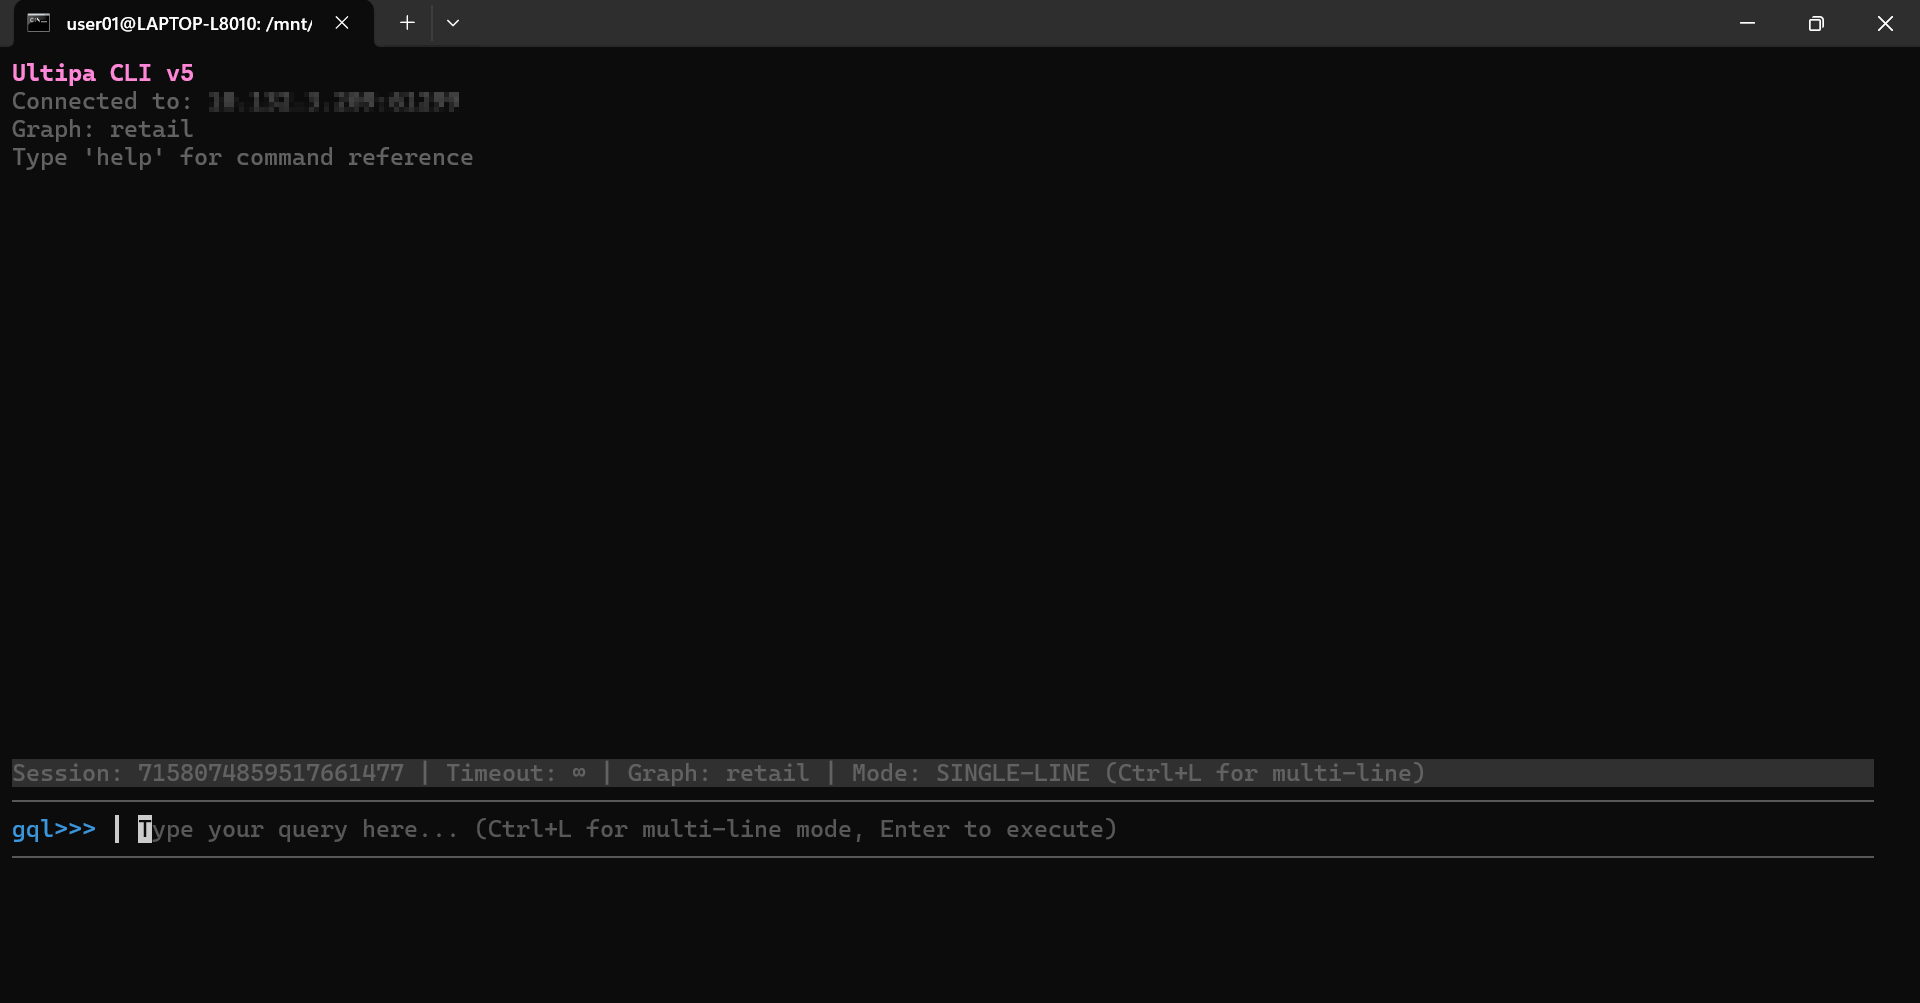
Ultipa CLI is a cross-platform (Linux, macOS) command line interface designed for operating Ultipa graph databases.
Prerequisites
- A command line terminal.
- Download Ultipa CLI from here.
The following steps are shown using Ubuntu running on Windows (via WSL).
Connect to Ultipa
Open the terminal and navigate to the folder containing the Ultipa CLI (e.g., ultipa-cli-linux-amd64).
Connect to the database:
./ultipa-cli-linux-amd64 -h <host> -u <username> -p <password> -g <graphName>
Details
<host>: The IP address (or URI) and port of your Ultipa name server. To connect to a cluster, multiple hosts can be separated by commas.<username>and<password>: Your database credentials.<graphName>: Optional. The name of the graph you want to access in the database.
The CLI will create a session, test the connection, and validate the graph you specify:

After that, you will enter a session where you can operate the database:
Use Configuration File
Connect to the database using a configuration file (YML/JSON):
./ultipa-cli-linux-amd64 -c <filepath>

Example of the configuration file:
host: <host>
username: <username>
password: <password>
graph: <graphName>
{
  "host": "<host>",
  "username": "<username>",
  "password": "<password>",
  "graph": "<graphName>"
}
All Flags
Ultipa CLI supports the following flags:
Flag |
Description |
|---|---|
-h, --host |
The IP address (or URI) and port of your Ultipa name server. To connect to a cluster, multiple hosts can be separated by commas. |
-u, --username |
Database username for host authentication. |
-p, --password |
Password of the above database user. |
-g, --graph |
The graph to select as the current graph; the default is default. |
-c, --config |
Path to the configuration file (YML/JSON) |
--crt |
Local TSL file path for encrypting the transmission. |
-t, --timeout |
Connection timeout threshold in seconds; the default is 2147483647s. |
--version |
Displays version of the Ultipa CLI. |
Database Operations
After connecting to Ultipa, you can interact with the database using0 GQL/UQL queries or CLI commands. The session operates in either GQL or UQL mode, supporting queries in the corresponding syntax. Note that most CLI commands can be executed in both modes unless otherwise specified.
Run Queries
Ultipa CLI starts a session in the GQL mode by default.
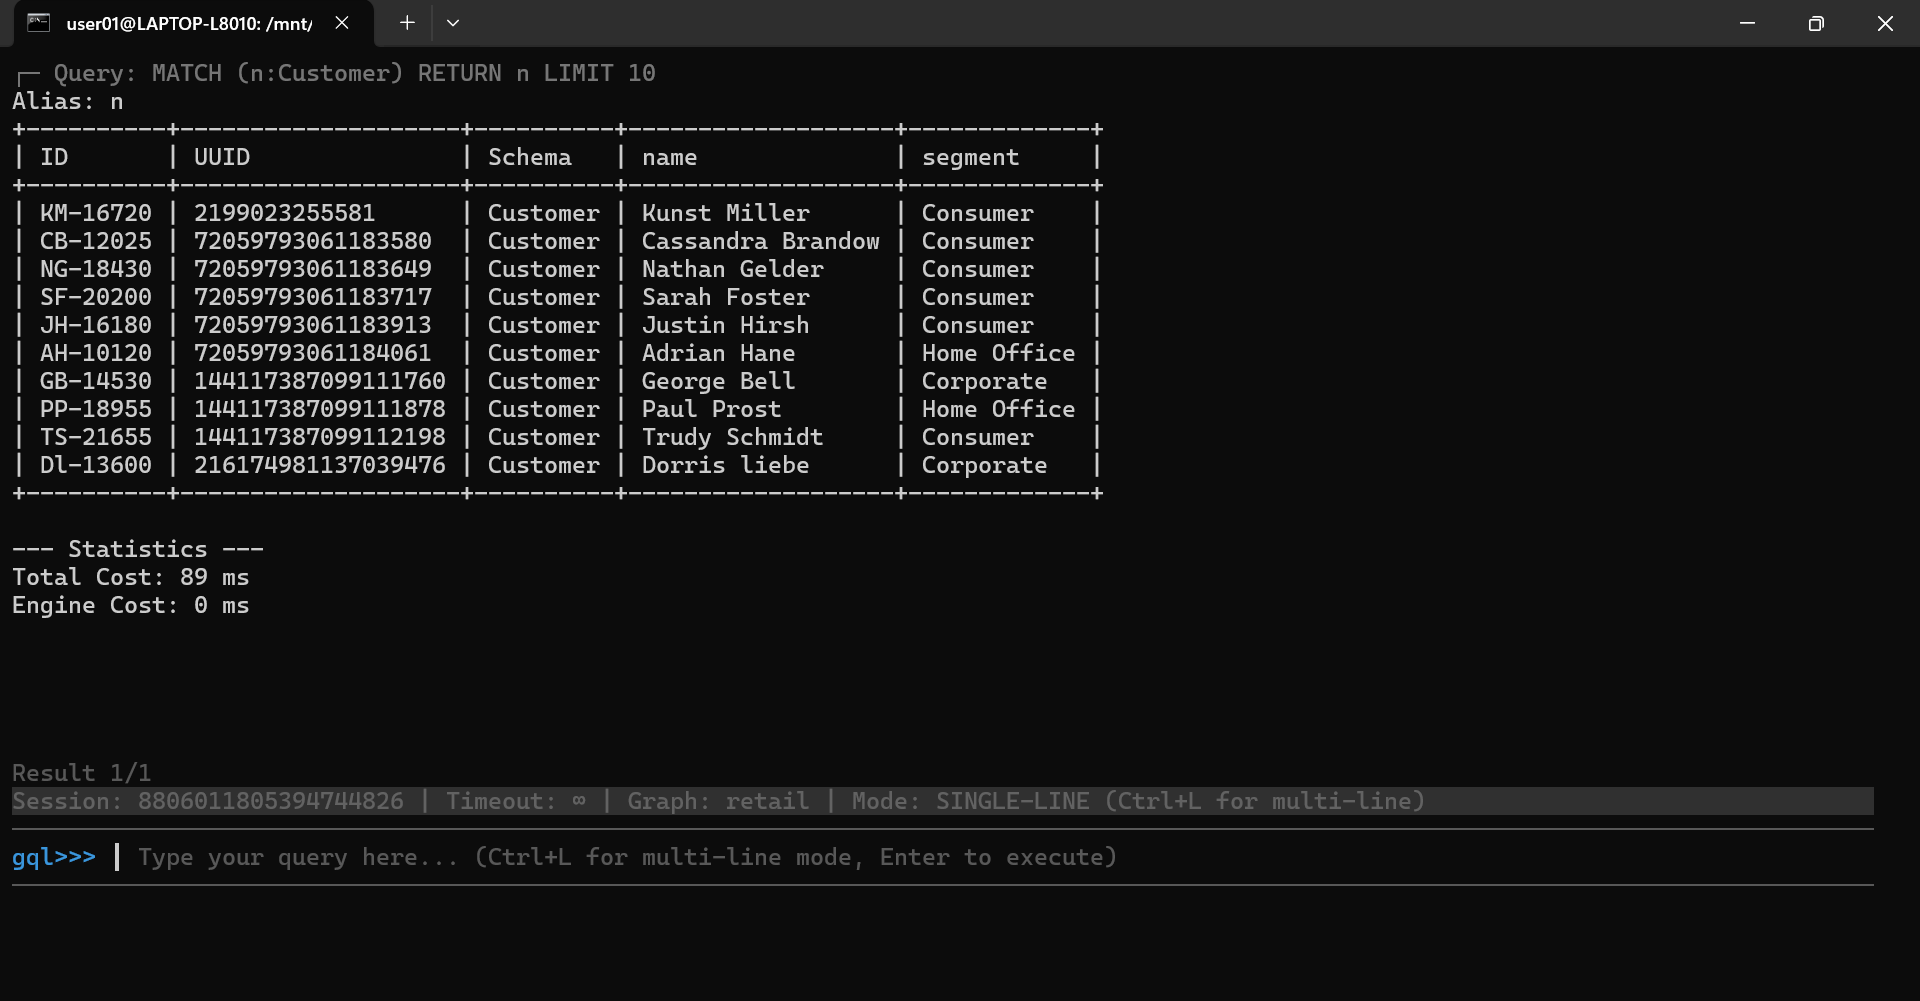
For example, to retrieve 10 Customer nodes from the current graph, type the following GQL and hit Enter:
MATCH (n:Customer) RETURN n LIMIT 10

You will see the query result:
If you want to run UQL queries, first switch to the UQL mode by running the uql command:

Then you can run UQL queries. For example:
find().nodes({@Customer}) as n return n limit 10

The output is the same as shown in the GQL query example above.
To switch back to GQL mode at any time, simply run the gql command:

Select a Graph
To select a graph in the database as the current graph, run the use <graphName> command. For example,

After running this command, you will see that miniCircle is selected as the current graph:

Manage Transactions
The commands for managing transactions are only supported in the GQL mode.
To start a transaction, run the start or begin command:
You will enter a transaction:
Next, you may run queries to modify the graph. For example, to insert a new Order node:
INSERT (:Order {_id: "CA-2025-151428", sales_people: "Kelly Williams"})
And to insert a new PLACES_ORDER edge:
MATCH (cst:Customer {_id: "GB-14530"}), (order:Order {_id: "CA-2025-151428"})
INSERT (cst)-[:PLACES_ORDER {date: "2025-03-30"}]->(order)
You can either run the commit or rollback command to terminate the transaction:
commit: All operations within the transaction are permanently applied to the database.rollback: All operations within the transaction are discarded, and the database state is reverted to its condition before the transaction began.
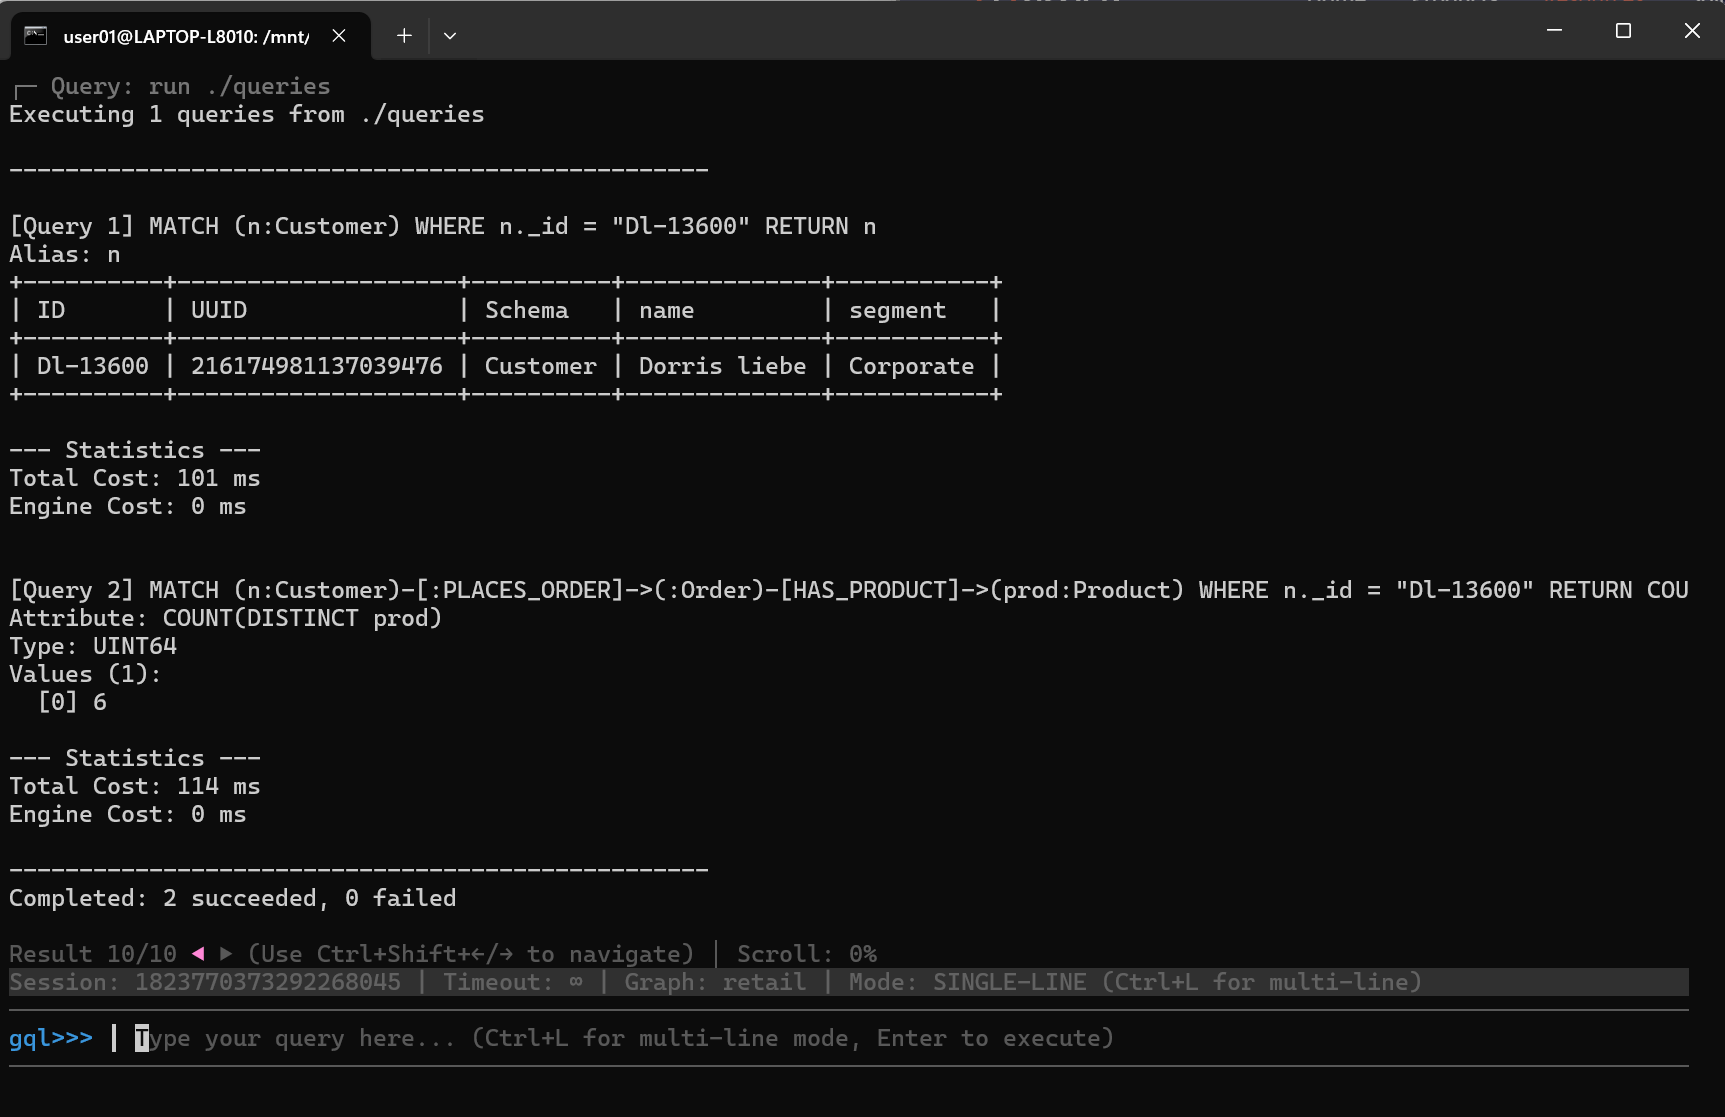
Execute a File Containing Queries
If you need to execute multiple queries at once, you can place them in a file and run that file within your session.
For example,
MATCH (n:Customer) WHERE n._id = "Dl-13600"
RETURN n;

MATCH (n:Customer)-[:PLACES_ORDER]->(:Order)-[HAS_PRODUCT]->(prod:Product)
WHERE n._id = "Dl-13600"
RETURN COUNT(DISTINCT prod);
The file should contain only GQL or UQL queries. Each query must end with a semicolon (;), and they will be executed sequentially in the order they appear. The file does not require a specific extension—you may leave it blank, or use .gql, .uql, .txt, and so on.
Execute the file using the run <filepath> command:

You will see result for each query:
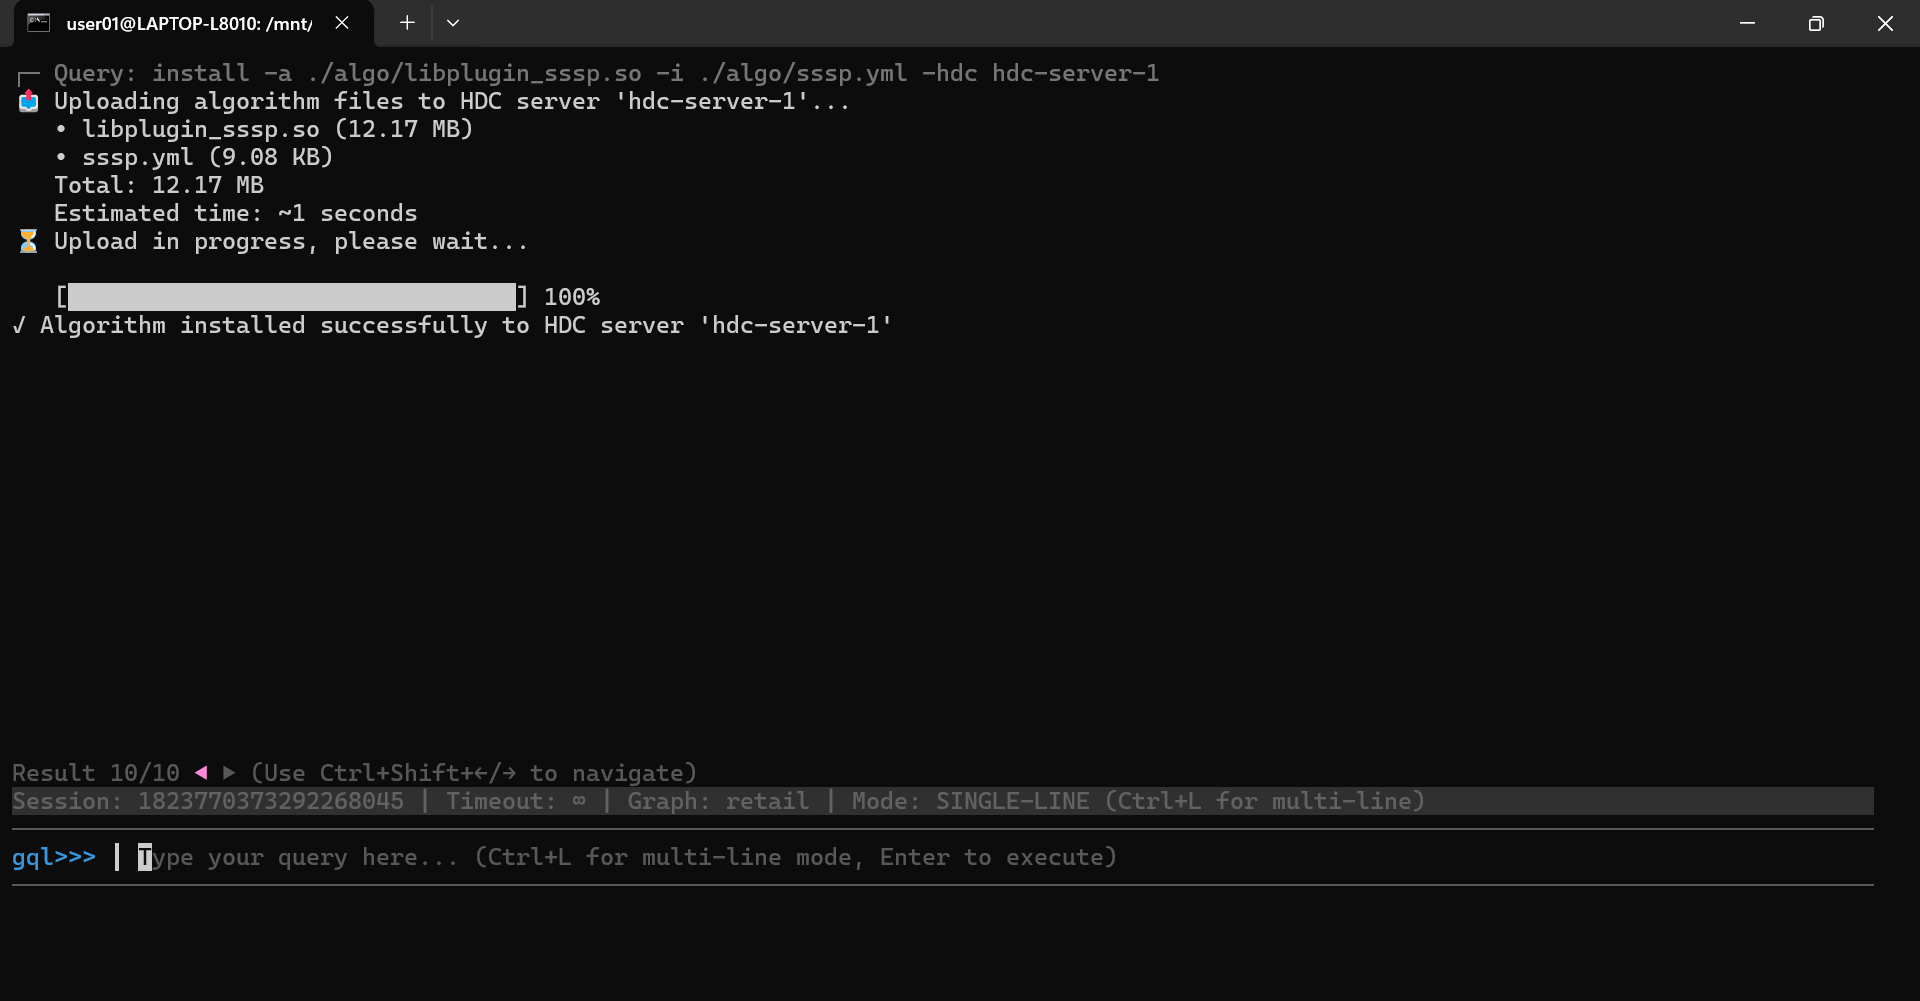
Manage Algorithms
To install an algorithm, use the install command with the following options: -a to specify the algorithm library file (.so), -i to specify the configuration file (.yml), and -hdc to specify the name of the HDC server where the algorithm will be installed:
install -a ./algo/libplugin_sssp.so -i ./algo/sssp.yml -hdc hdc-server-1

You will see a confirmation indicating that the algorithm has been installed successfully:
To uninstall an algorithm, use the uninstall command with the following options: -n to specify the name of the algorithm, and -hdc to specify the name of the HDC server where the algorithm will be uninstalled:
uninstall -n sssp -hdc hdc-server-1

You will see a confirmation indicating that the algorithm has been uninstalled successfully:

Session Operations
Switch Between Single-Line and Multi-Line Modes
By default, the Ultipa CLI is in single-line mode. After entering a command or a GQL/UQL query, press Enter to execute it.
Press Ctrl + L to switch to multi-line mode. In multi-line mode, Enter creates a new line, and Ctrl + E executes the command. Press Ctrl + L again to switch back to single-line mode.

Execute Multiple Queries
You can write multiple queries separated by commas (,), and execute them together. The Ultipa CLI will run each query sequentially and return the results in order.

Select Suggested Keywords
Ultipa CLI provides auto-suggestions as you type. To select a suggested keyword, fist press Down on your keyboard, then use Up and Down to navigate, and press Enter to confirm your choice.
Select, Copy, and Paste
To select some text:
- Linux terminals: Hold
Shiftand use the mouse to select. - macOS Terminal.app: Hold
Fnand use the mouse to select. - macOS iTerm2: Hold
Option/Altand use the mouse to select
Press Ctrl + Shift + C or Cmd + C (macOc) to copy the selected text.
Press Ctrl + Shift + V or Cmd + V (macOc) to paste.
Browse History
You can navigate the recent queries and commands using the keyboard shortcut Up or Down.
To display the latest 50 commands or queries executed in the session, you can run the history command:

Note that a .ultipa_cli_history file is also created in the same directory as the Ultipa CLI. This file records the execution history of your commands and queries.
To clear the history of the session, run the clear-history command.
Browse Recent Results
Ultipa CLI retains up to the 10 most recent query results. You can navigate between them using the left or right command, or by using the keyboard shortcut Ctrl + Shift + Left/Right.
Clear Input
To clear the current input, use the keyboard shortcut Ctrl + C.
Exit Session
To exit the session and disconnect from Ultipa, press Ctrl + C twice, or press Ctrl + D once.
All Session Commands
Ultipa CLI provides the following commands once you are connected to a database session:
Command |
Parameter |
Description |
|---|---|---|
gql |
/ | Switches the session to GQL mode. |
uql |
/ | Switches the session to UQL mode. |
use |
Graph name | Selects a graph to work with. |
start, begin |
/ | Starts a transaction. |
commit |
/ | Commits the current transaction. |
rollback |
/ | Rolls back the current transaction. |
run |
File path | Executes queries from a file. |
left |
/ | Views the previous query result. |
right |
/ | Views the next query result. |
history |
/ | Displays the latest 50 commands or queries executed in the session. |
clear-history |
/ | Clears the session history. |
clear, cls |
/ | Clears the terminal screen. |
help, ? |
/ | Shows help information. |
/ |
/ | Lists all commands. Commands may be used with or without / at the beginning. |