This page explains what graph data looks like and how they are described in UQL. This must be mastered before leanring and using Ultipa Graph System.
Graph Data
Node
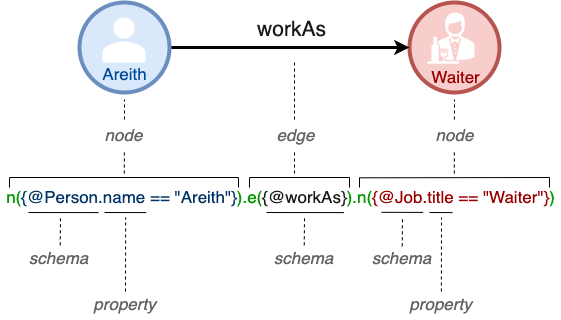
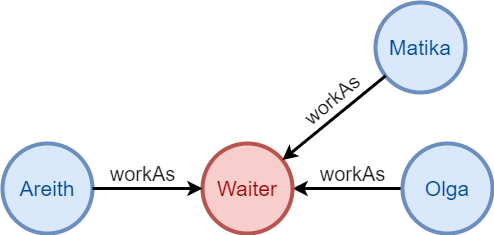
The two circles Areith and Waiter shown in Chart1 are nodes.
Nodes represent entities in the world.
Edge
The black arrow workAs in Chart1 is an edge, it points from Areith to Waiter.
Edges represent relations between entities.
Schema
The Person, Job and workAs in the code in Chart1 are schemas.
Schemas represent different types of node or edge.
Property
The name and title in the code in Chart1 are properties.
Properties are the components of a schema to describe in detail the type of node or edge this schema represents.
Path
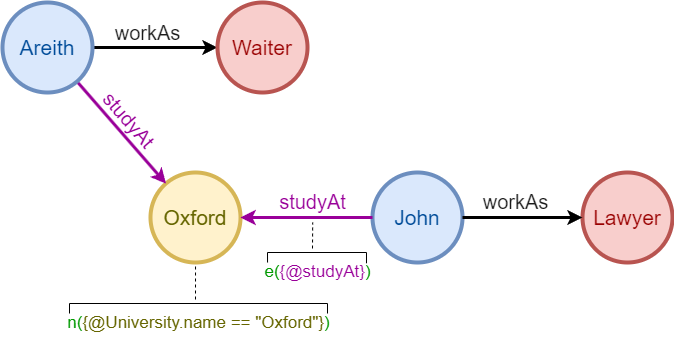
The sequence of connected and alternating nodes and edges Areith, workAs and Waiter in Chart2 is a path. Another sequence Waiter, workAs, Areith, studyAt, Oxford is also a path.
A path starts from and ends with node, contains at least one edge. It represents multi-step correlations of entities, which makes it the most queried in graph computing.
Describe Nodes
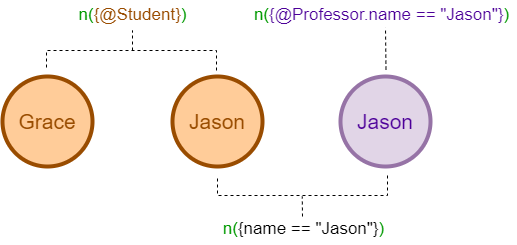
There are a bunch of parameters that can describe node(s) in UQL. Take parameter n() as an example:
n()									// any node in the graph
n({@Student})						// nodes of schema 'Student'
n({name == "Jason"})				// nodes whose property 'name' is 'Jason'
n({@Student.name == "Jason"})		// nodes of schema 'Student' whose property 'name' is 'Jason'
n(as a)								// any node in the graph, and give these nodes an alias 'a'
n({@Student} as a)					// ...
...
Features of describing nodes using n():
- An
n()without{}or with emplty curly braces{}sets no particular requirements on nodes - Filtering schema requires symbol
@ - Schema and property can be filtered in combinition or separately
- Assigning alias to the found nodes requires keyword
asto be following{}(if has)
All parameters that can describe node(s) in UQL:
nodes(): used in query, update and deletion of nodesn(): used in template query to denote one node in the pathnf(): used in template query to denote consecutive nodes in the pathsrc(): used in non-template path query to denote the initial node of the pathdest(): used in non-template path query to denote the terminal node of the pathnode_filter(): used in non-template path query to denote all nodes other thansrc()anddest()
Describe Edges
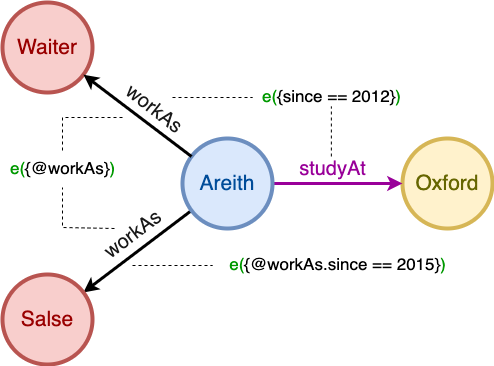
Take e() as an example to see how edges can be described:
e()									// any edge in the graph
e({@workAs})						// edges of schema 'workAs'
e({since == 2012})					// edges whose property 'since' is '2012'
e({@workAs.since == 2012})			// edges of schema 'workAs' whose property 'since' is '2012'
e(as b)								// any edge in the graph, and give these edges an alias 'b'
e({@workAs} as b)					// ...
...
Similar with describing nodes using n(), describing edges using e() has below features:
- An
e()without{}or with emplty curly braces{}sets no particular requirements on edges - Filtering schema requires symbol
@ - Schema and property can be filtered in combination or separately
- Assigning alias to the found edges requires keyword
asto be following{}(if has), and ane()representing consecutive edges does not supports defining alias
All parameters that can describe edge(s) in UQL:
edges(): used in query, update and deletion of edgese(): used in template query to denote one or consecutive edges in the pathle(): used in template query, similar toe()but pointing to the leftre(): used in template query, similar toe()but pointing to the rightedge_filter(): used in non-template path query to denote all edges in the path
Describe Paths (Template)
Paths described using n() and e() are template:
// any 1-hop path in the graph
n().e().n()

// any 2-hop path in the graph
n().e().n().e().n()
n().e()[2].n()

// 1-hop paths 'Person-workAs-waiter'
// give these Person an alias 'individual', give these paths an alias 'career'
n({@Person} as individual).e({@workAs}).n({@Job.title == "Waiter"}) as career

// 2-hop paths 'Areith-workAs-Job-workAs-Person'
// give these Job an alias 'job', give these Person at the end an alias 'other'
n({@Person.name == "Areith"}).e({@workAs}).n({@Job} as job).e({@workAs}).n({@Person} as other)

...
Features of path template:
- Path templates are as intuitive as how they are visualized in a graph
- Alias can be assigned for a single node, edge, as well as the whole path
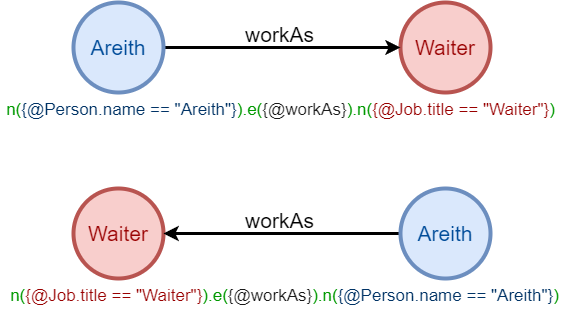
Are the two paths described in Chart6 the same? As paths in Ultipa are composed and parsed from left to right, the two templates are not the same, but they do describe the same graph data.

