Widget
You can expand the functionalities of Ultipa Manger through the Widget module. Developers can implement advanced custom applications and solutions as widgets. Users familiar with UQL can also benefit by creating widgets that execute specific UQLs as shortcut.
The widgets published can be conveniently accessed by users within Ultipa Manager and embedded into any other webpages.
Code Editor
The widget code editor has three sections: Template (HTML), Style (CSS), and Script (JavaScript).
NOTEThe current version of Widget does not facilitate the use of multiple HTML, CSS, and JavaScript files. It is specifically designed for smaller-scale creations.
Template
The Template section uses the Handlebars template. Codes written in this section are incorporated into the <body> tag in the final HTML output. In the current version, access to the other elements in the <html> tag, such as <head>, is not provided.
NOTEThere is no need to include the DOCTYPE, html, head, or body tags in this section; all these tags are built into the editor by design.
Handlebars uses double curly braces {{ }} to denote expressions that will be replaced with actual values during rendering.
Template<h1>{{text}}</h1>
<!-- Value of the variable 'text' is set in the script -->
Style
The Style section employs Less as the CSS preprocessor. Codes written in this section are included at the end within the <head> tag in the final HTML output.
Stylebody {
  font-family: system-ui;
  background: #eff3f4;
  color: #00B0F0;
  text-align: center;
}
Script
In the Script section, initial steps should be:
- Import the template and style.
- Define and instantiate a child class of
ModuleInterfacewith proper script logic.
1. Render with Custom Layout
Scriptimport "./index.less"
import template from "./index.hbs"Click to expand
Results Preview:

2. Render with Default Layout
In most cases, when aiming to send an UQL and receive the server response, it's essential to utilize an instance of the Client class and render the query results using the default Ultipa layout.
Scriptimport "./index.less"
import template from "./index.hbs"Click to expand
Results Preview:
Note: This example retrieves 10 paths from the currently selected graph and applies the currently selected style for that graph. Therefore, the outcome may vary for you.
NOTEIf you intend to render data not retrieved from Ultipa Graph with the default layout, ensure that the data structure complies with the server response before passing it into
_renderUltipaData().
3. Import Third-Party Libraries and Frameworks
The following is a list of dependencies loaded with the JavaScript editor:
Scriptdependencies:{
    "3d-force-graph": "^1.73.0",Click to expand
To load some of them:
Scriptimport * as echarts from 'echarts'
import axios from 'axios'
If the library or framework needed is not included in the list, load the external JavaScript file asynchronously during initialization:
Script...
class ManagerModule extends ModuleInterface {
    ...

    async loadJS(url) {
        let response = await axios(url)
        eval(response.data)
    }

    async init() {
        await this.loadJS("https://code.jquery.com/jquery-3.6.0.min.js")
        this._render()

        ...
    }

    ...
}
Form Configurations
Construct the Form
You can integrate variables requiring user input into the form and pass the variable's value to the script.
For each variable, you need to configure the following:
Item | Description | Specification |
|---|---|---|
| Variable | Name of the variable | Must be consistent with what is specified in the script |
| Label | User-friendly label for the input | / |
| Placeholder | Placeholder for the input | / |
| Type | Type of the variable | Certain types offer further configurations |
Here are the data types associated with each (variable) type:
| Type | Data Type |
|---|---|
| String | string |
| Number | number |
| Node_Input | string (node ID) |
| Radio | string |
| CheckBox | []string |
| Select | string or []string |
| Schema | string |
| Property | string |
| Date Time | string |
| UQL | string |
Call a Form Item in Script
You can pass formData into the execute() function and retrieve the value of a variable using formData?.<variable_name>:
Script...
class ManagerModule extends ModuleInterface {
    ...

    async execute(formData) {
        // The variable name in this example is 'limitNo' with the type Number; set the default as 1
        const resp = await this.client.uql(`find().nodes() as n return n{*} limit ${
          formData?.limitNo || 1
        }`)
        this._renderUltipaData(resp)
    }

    ...
}
Compile, Test, and Publish
Compile
Click the Compile button before testing or publishing the widget. Compile is needed for any code modification.
Test
Click the Test to run the widget. Edit any user-input variables by clicking the gear icon next to the button.
Review the results in the Results Preview pane. If the script contains any UQL, please note that the widget is executed on the currently selected graph.
Additionally, when it's rendered with the default layout, the Results Preview pane only supports the default style. To apply custom styles, please first publish the widget, then nagivate to the widget by clicking the widget icon next to the UQL Editor and run it.
Publish
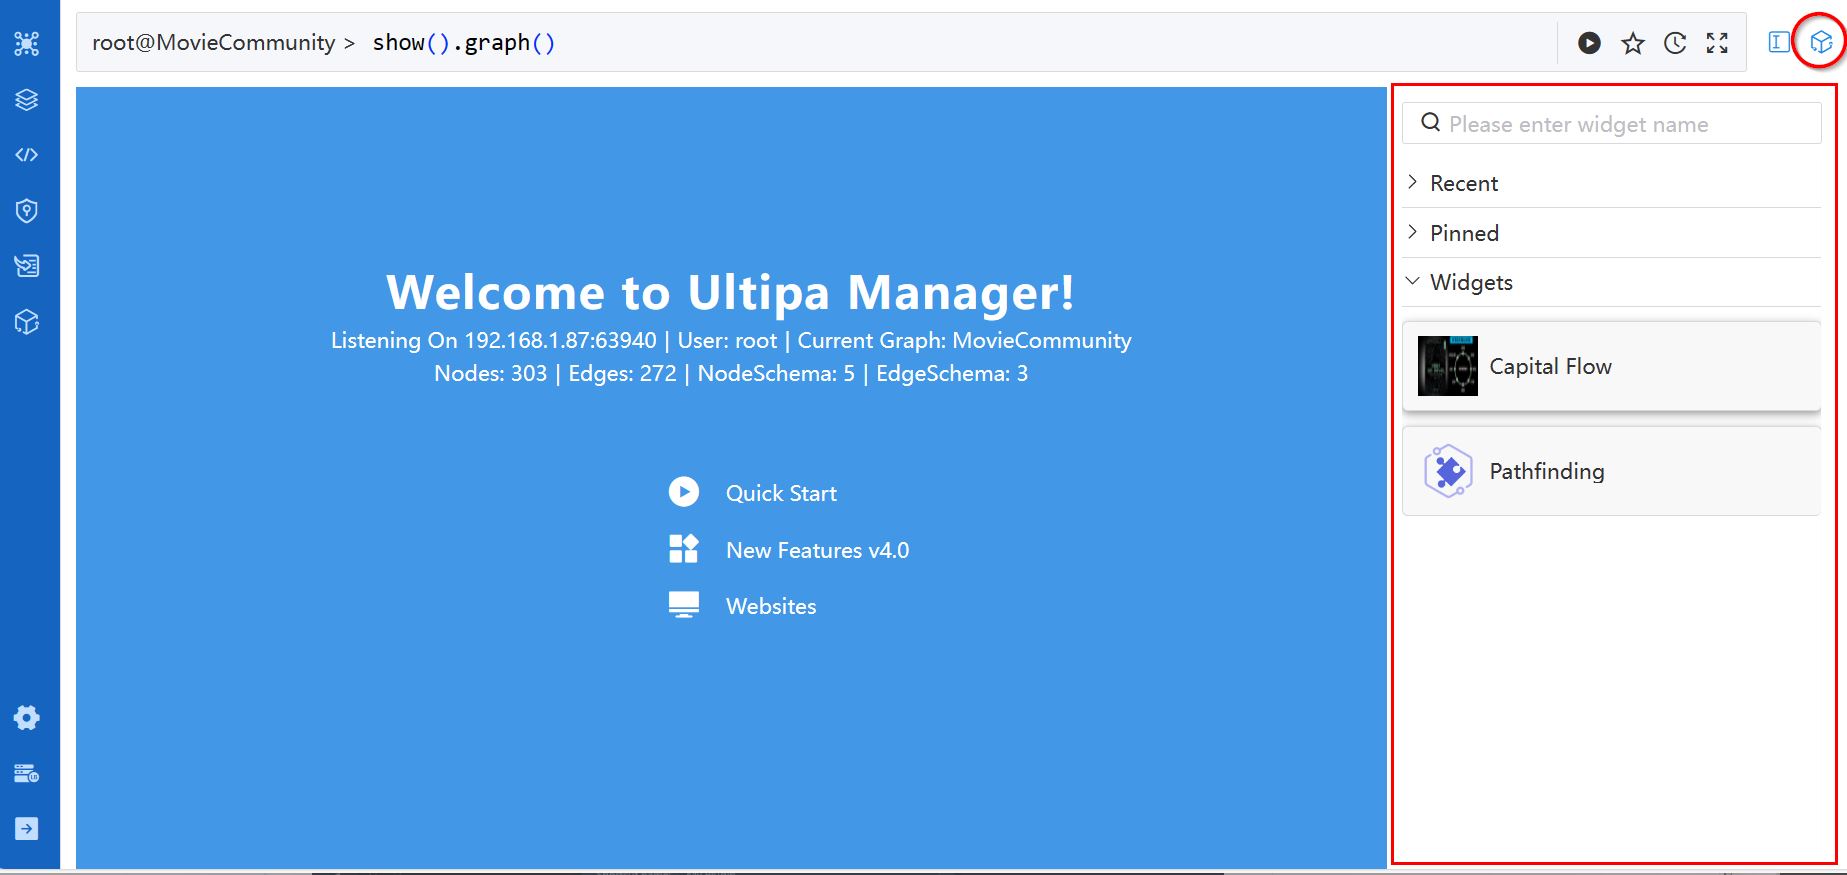
Click the Publish button to publish the widget. Published widgets are accessible by clicking the Widget icon available in some modules.
Re-publish if any change is made to the widget.
Settings
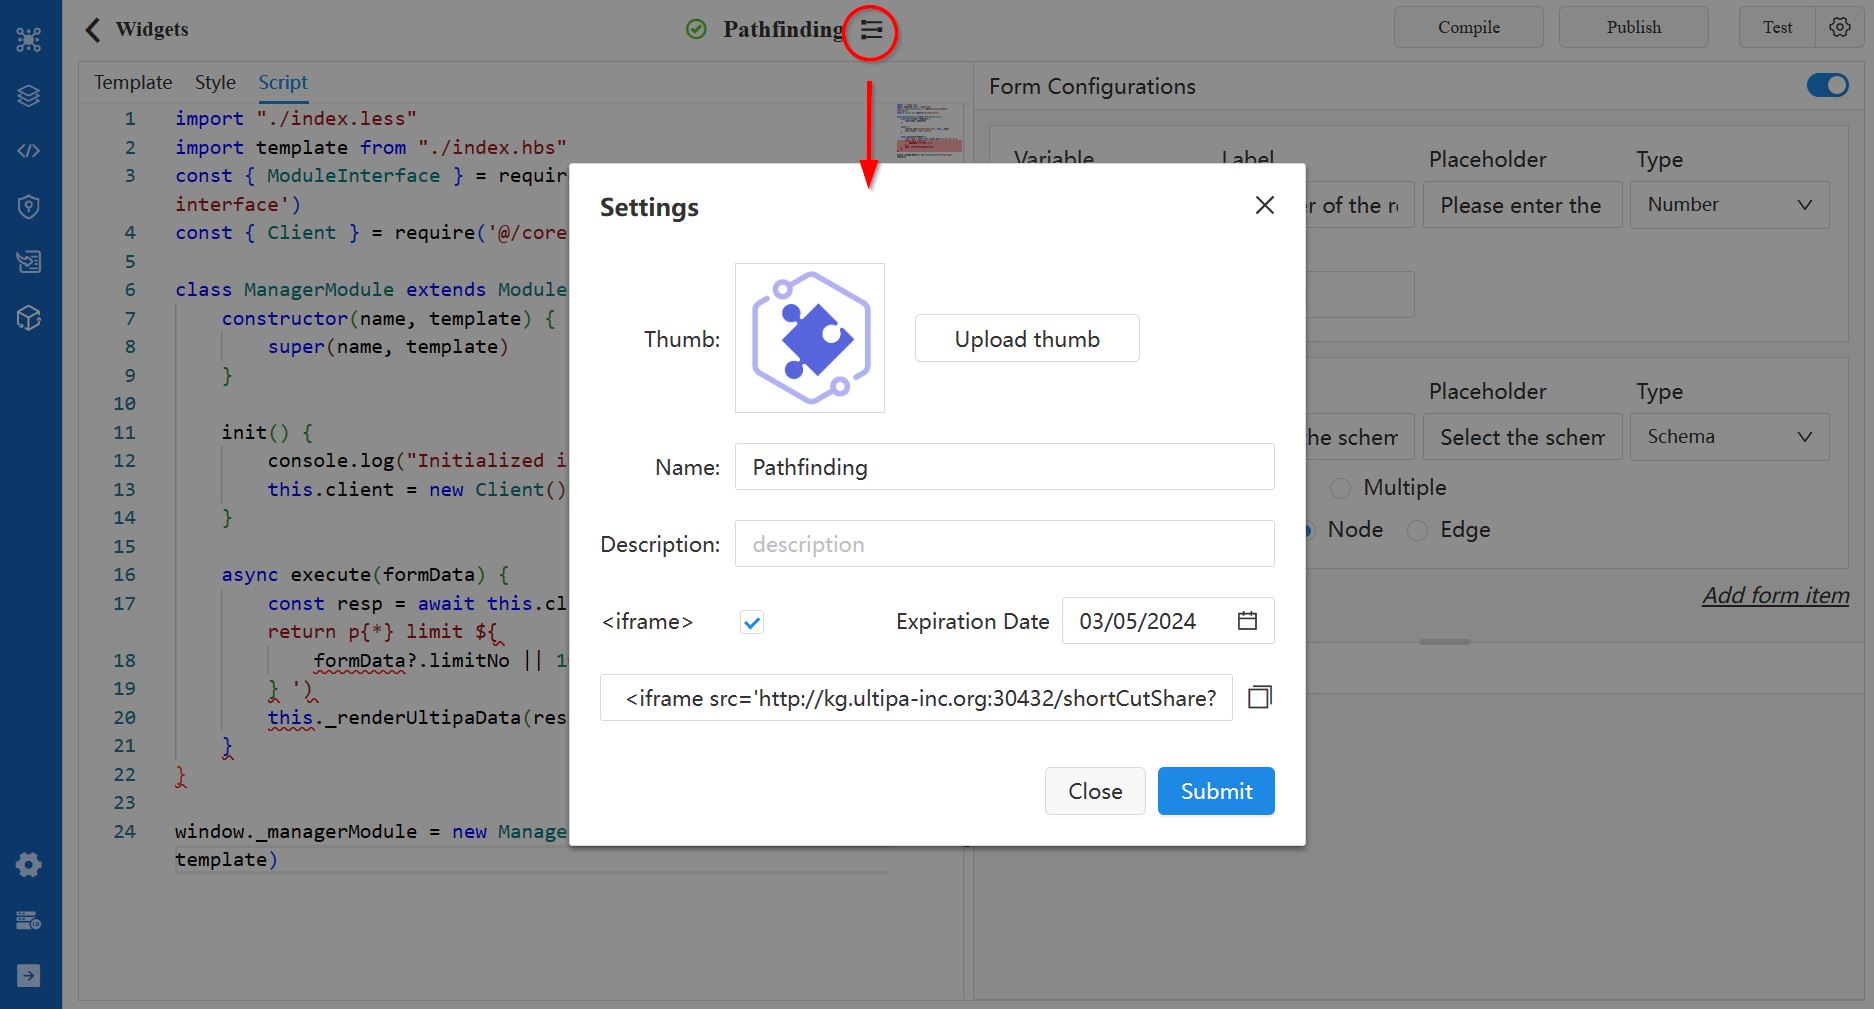
Click the icon next to the widget name on the widget settings. From there, you can rename the widget, edit description, and set the thumbnail (the recommended size is 180px*180px).
You can also enable the <iframe> option, providing an <iframe> element to be used in another HTML file to display the widget on that webpage before the set expiration date. The <iframe> element has a src attribute that specifies the URL of the webpage to be embedded, and it includes the following parameters:
Parameter | Description | Specification |
|---|---|---|
| shortCutId | ID of the shortcut | / |
| params | All variables and their values set in the Test form | / |
| theme | Display theme | light, dark |
| colorStyleSelected | ID of the currently selected style | / |
| shareToken | Cookie generated for using the widget in another webpage | / |
The <iframe> element is regenerated when you uncheck and re-check the <iframe> option or change the expiration date.
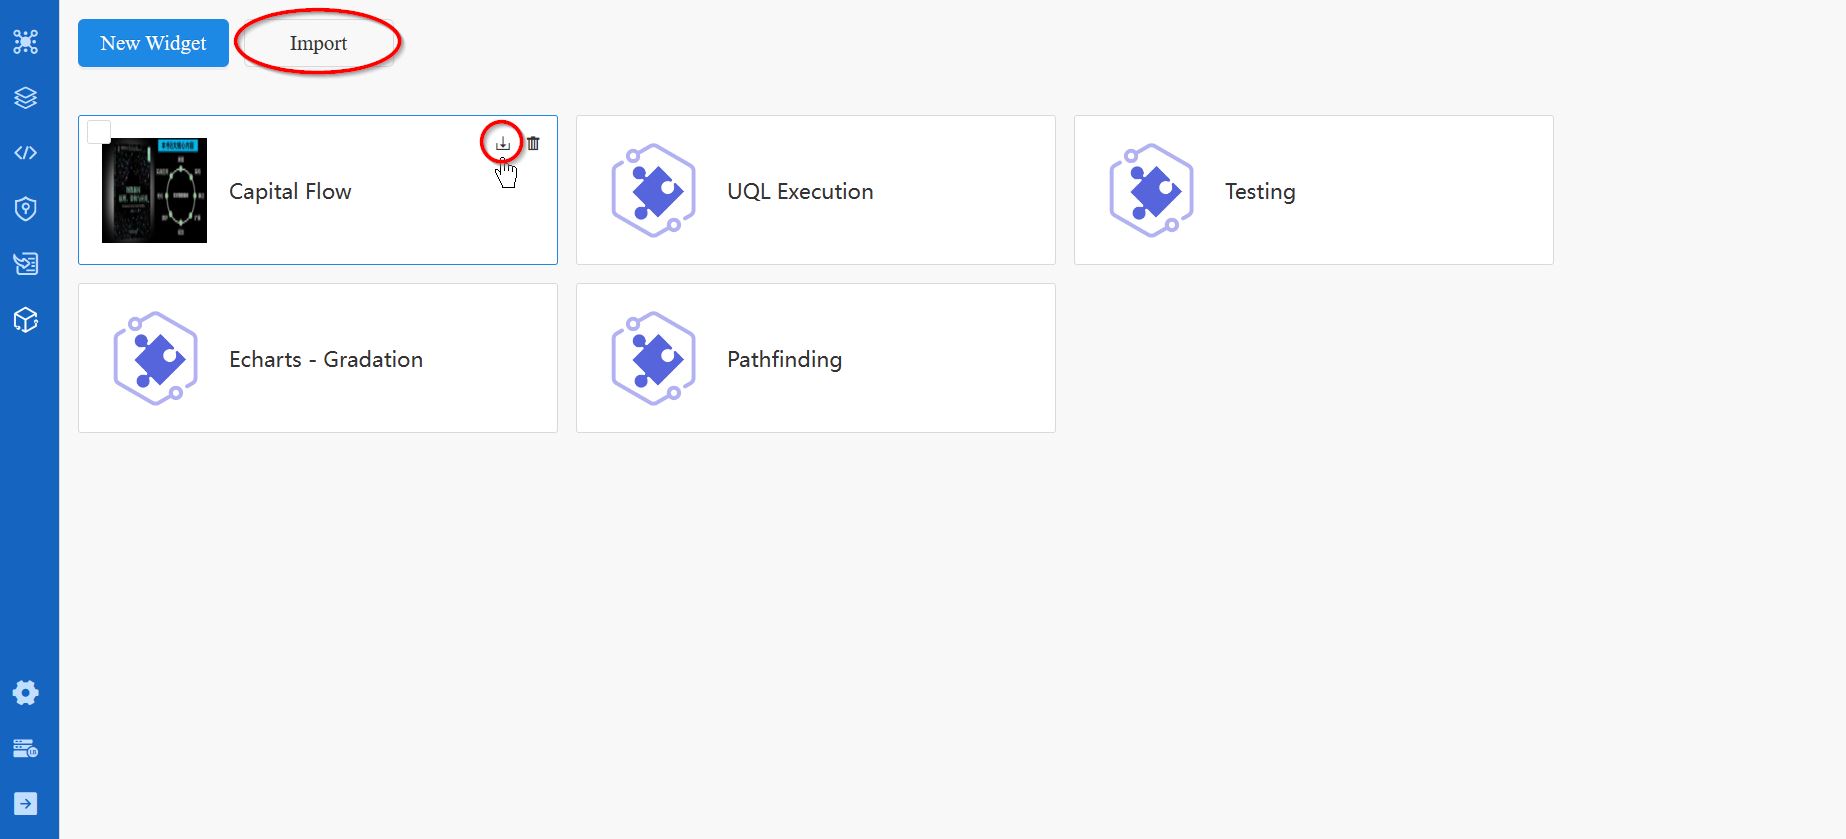
Import/Export Widget
You can export any widget as a ZIP file from the widget card. Click the Import button on the Widget main page to import a widget.