Backup and Restore
Backing up the database is essential to protect data integrity, prevent data loss, and ensure disaster recovery in case of hardware failure, accidental deletion, or corruption. It also enables database migration, replication, and rollback to a previous state if needed.
You can create a backup from a running database using GQL, UQL, or the ultipa_backup_client tool. The backup includes user-created graphs on Shard servers and system global graphs on both Shard and Meta servers.
Using GQL
Create a Backup
Create a backup named backup_20250101:
GQLCREATE BACKUP backup_20250101
If the specified backup name already exists, differential backup is performed; otherwise, a full backup is created.
Show Backups
Show all backups:
GQLSHOW BACKUP
Show a specific backup:
GQLSHOW BACKUP backup_20250101
Each backup provides the following metadata:
Field | Description |
|---|---|
backup_name | The name of the backup. |
backup_uuid | The UUID of the backup. |
start_time | The timestamp when the backup creation began. |
end_time | The timestamp when the backup creation ended. |
status | Current status: DONE, RUNNING, or FAILED. |
msg | Error message, if any. |
Drop a Backup
GQLDROP BACKUP backup_20250101
Restore a Backup
GQLRESTORE BACKUP backup_20250101
Using UQL
Create a Backup
Create a backup named backup-20250101:
UQLdb.backup.create("backup_20250101")
The backup creation is executed as a global job, you may run show().job().global() afterward to verify the success of the creation.
If the specified backup name already exists, differential backup is performed; otherwise, a full backup is created.
View Backups
Retrieves all backups created for the database:
UQLdb.backup.show()
Or retrieves a specific backup, such as the one named backup_20250101:
UQLdb.backup.show("backup_20250101")
It returns a table _backupList with the following fields:
Field | Description |
|---|---|
backup_name | Backup name. |
backup_uuid | Backup _uuid |
start_time | The timestamp when the backup creation begins. |
end_time | The timestamp when the backup creation ends. |
status | Current status of the backup, which can be DONE, RUNNING or FAILED. |
msg | Error message of the backup creation. |
backup_infos | Backup information for each graph, including:
Note: The default setting of the db_backup_path is backup_data. You can find this directory in the default working directory of the container. |
Using the Client
Ultipa Backup Client (ultipa_backup_client) is a cross-platform (Windows/Mac/Linux) command line interface designed for managing and restoring backups for Ultipa graph databases.
Prerequisites
- A command line terminal.
- Linux or MacOS: Bash, Zsh, TCSH
- Windows: PowerShell
- Download Ultipa Backup Client from here. No installation is required.
NOTEThe following examples are demonstrated using a Bash shell on Linux.
Navigate to the directory containing the ultipa_backup_client. Ensure it has the appropriate execute permissions by running:
Bashchmod +x ultipa_backup_client
Generate Configuration File
Run the command to generate a sample configuration file:
bash./ultipa_backup_client -sample

A file named example.backup.config will be generated in the same directory as ultipa_backup_client. If the file already exists, it will be overwritten.
Create a Backup
To create a backup, modify the [server] section in the example.backup.config file based on your environment.
Example:
example.backup.config[server]
; database host (name server address)
host     = 192.168.189.129:61060
; database username
username = root
; database password
password = <password>
; backup name (supports only letters, numbers, and underscores)
name     = backup_1
Other settings in example.backup.config are not used when creating a backup.
Run the command to create a backup:
Bash./ultipa_backup_client -mode backup -config example.backup.config
If the specified backup name already exists, differential backup is performed; otherwise, a full backup is created.

View Backups
Run the command to view the information of all backups:
Bash./ultipa_backup_client -mode backup_info -config example.backup.config

The backup_info column is omitted here. To view detailed backup information, run the UQL statement db.backup.show() in the database.
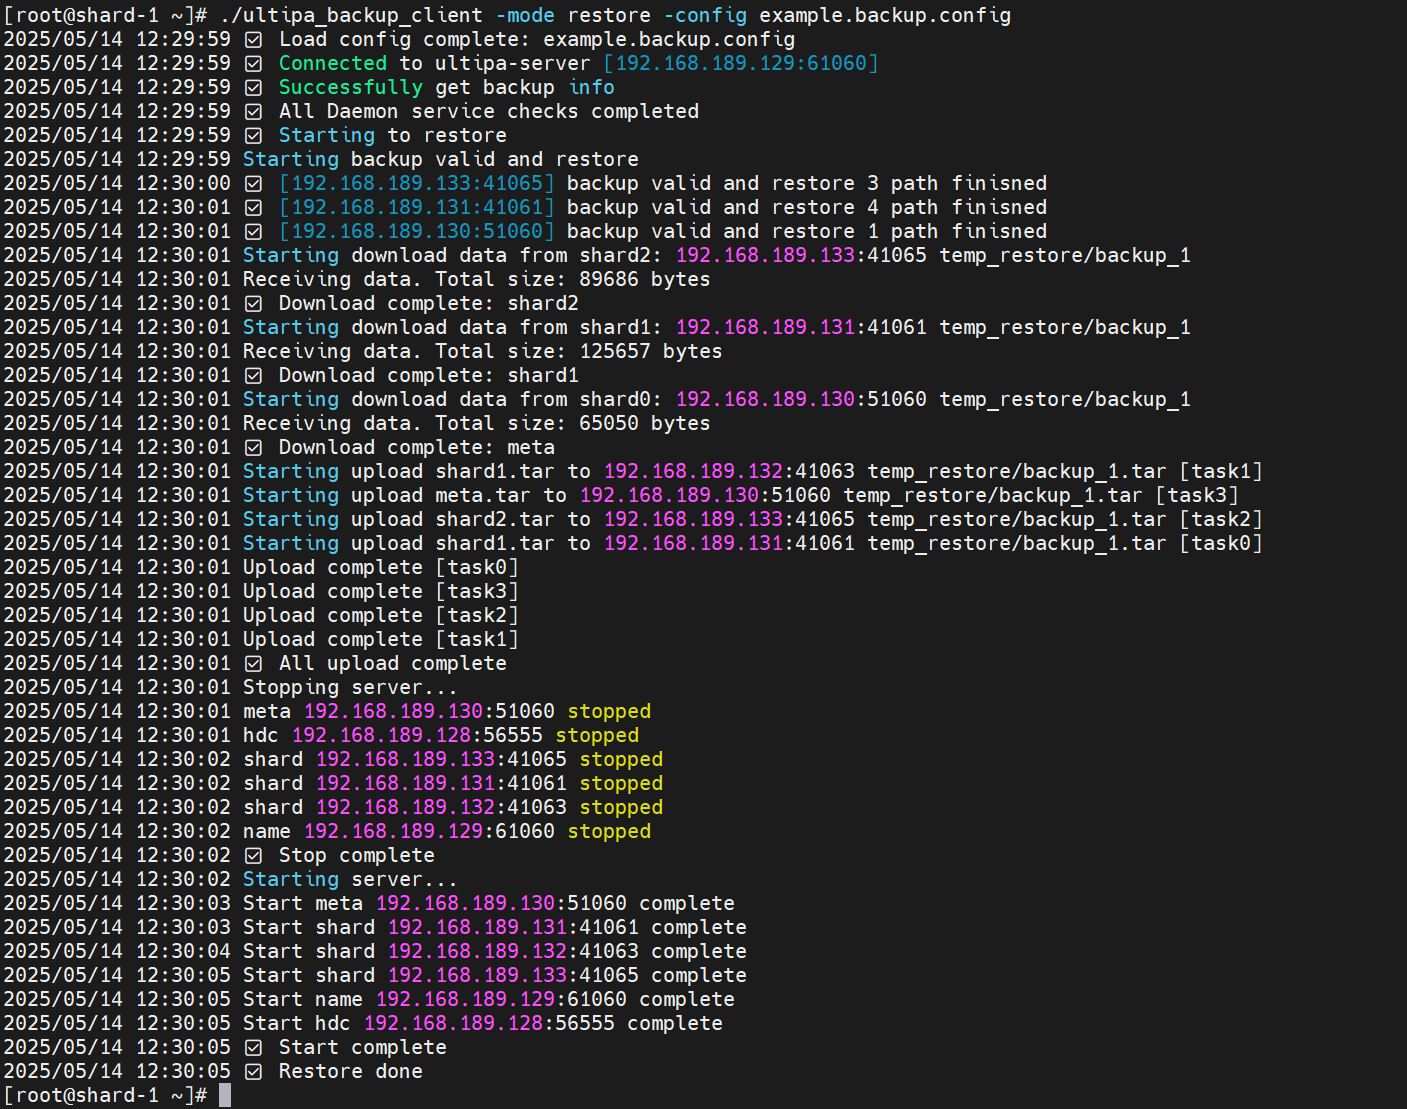
Restore a Backup
A backup artifact can be restored within the same database.
To restore a backup, you need to further modify the example.backup.config file based on your environment.
Notes:
- The
namein[server]section must match theuuidin[restore]section to correctly identify the backup. - The
shard-datain[restore]section must match thedbpathof your Shard servers (default:shard_data). - The
meta-datain[restore]section must match thedbpathof your Meta servers (default:data). - For Shard, Meta, Name, or HDC clusters, the order of server addresses and daemon addresses must correspond exactly. All replicas in a shard must be included.
- Daemon Address Configuration:
- Each server's daemon address is configured in
backup.configfile located in the container'sconfigdirectory. This file is automatically generated during first startup with the default settinglisten = :50051, and it uses the machine's primary IP address. - Modify
backup.configto resolve port conflicts (format:ip:portor:port) if needed.
- Each server's daemon address is configured in
- Omit the
[hdc]section entirely if no HDC servers are deployed.
Example:
example.backup.config[server]
; database host (name server address)
host     = 192.168.189.129:61060
; database username
username = root
; database password
password = <password>
; backup name (supports only letters, numbers, and underscores)
name     = backup_1

[restore]
; backup uuid for restore (must match the specified backup name)
uuid       = T20250514031515_N1_158_6
; shard server dbpath
shard-data = shard_data
; meta server dbpath
meta-data  = data

; shard config for restore
[shard]
; all replica addresses for shard-1
shard1-address  = 192.168.189.131:41061,192.168.189.132:41063
; all daemon addresses for shard-1
daemon1-address = 192.168.189.131:50051,192.168.189.132:50051
; all replica addresses for shard-2
shard2-address  = 192.168.189.133:41065
; all daemon addresses for shard-2
daemon2-address = 192.168.189.133:50051

; meta config for restore
[meta]
; all meta addresses
meta-address   = 192.168.189.130:51060
; all daemon addresses for meta server
daemon-address = 192.168.189.130:50051

; name config for restore
[name]
; all name server addresses
name-address   = 192.168.189.129:61060
; all daemon addresses for name server
daemon-address = 192.168.189.129:50051

; hdc config for restore, if exists
[hdc]
; all hdc addresses
hdc-address    = 192.168.189.128:56555
; all daemon addresses for hdc sever
daemon-address = 192.168.189.128:50051
Run the command to restore the database to the specified backup:
Bash./ultipa_backup_client -mode restore -config example.backup.config
NOTENote: All servers will be stopped and restarted as part of the restoration process.
All Flags
ultipa_backup_client supports the following flags:
Flag | Parameter |
|---|---|
-mode | Specifies the operation mode: backup, backup_info, or restore. |
-config | Specifies path to the configuration file (default: backup.config). |
-sample | Generates a sample configuration file (example.backup.config). |
-version | Displays the version of ultipa_backup_client. |
Point-in-Time Recovery
NOTEPITR is only available via GQL.
Point-in-Time Recovery (PITR) enables restoring the database to any consistent point in time. It works by continuously archiving WAL (Write-Ahead Log) files and periodically creating cross-shard recovery points. Combined with a base backup, you can recover the database to any moment between your oldest backup and the latest recovery point.
Disk Protection
Ultipa monitors disk usage on shard servers and responds with graduated protection levels:
| Level | Usage Range | Behavior |
|---|---|---|
| NORMAL | < 70% | All operations allowed. |
| WARN | 70% – 85% | Warning logged; all operations allowed. |
| HIGH | 85% – 95% | Warning logged; WAL archiving paused. |
| CRITICAL | > 95% | DML writes (INSERT, SET, DELETE, UPSERT) blocked; reads always allowed. |
Add the following section to both shard-server.config and name-server.config:
Ini[Disk]
disk_monitor_enabled = true
disk_monitor_interval_s = 10
disk_warn_percent = 70
disk_high_percent = 85
disk_critical_percent = 95
Parameter | Default | Hot-Updatable | Description |
|---|---|---|---|
disk_monitor_enabled | true | Yes | Enables or disables background disk monitoring. |
disk_monitor_interval_s | 10 | Yes | Disk check interval in seconds. |
disk_warn_percent | 70 | Yes | Usage % threshold for WARN level. |
disk_high_percent | 85 | Yes | Usage % threshold for HIGH level. |
disk_critical_percent | 95 | Yes | Usage % threshold for CRITICAL level. |
Recovery Points
When PITR is enabled, the name server periodically collects sequence numbers from all shard servers to create recovery points — consistent cross-shard snapshots that mark a restorable point in time. Meanwhile, each shard server continuously archives its WAL files to a designated directory.
To show all available recovery points:
GQLSHOW RECOVERY POINTS
Each recovery point provides the following metadata:
Field | Description |
|---|---|
id | Monotonically increasing recovery point identifier. |
timestamp | When the recovery point was created. |
shard_count | Number of shards included in this recovery point. |
label | A descriptive label (e.g., auto-barrier-1). |
Add the following section to name-server.config:
Ini[PITR]
enabled = false
barrier_interval_s = 60
retention_hours = 24
archive_path = /data/wal_archive
max_archive_size_mb = 10240
Parameter | Default | Hot-Updatable | Description |
|---|---|---|---|
enabled | false | Yes | Enables or disables PITR (recovery point collection and WAL archiving). |
barrier_interval_s | 60 | Yes | Interval between recovery points in seconds. |
retention_hours | 24 | Yes | How long to retain recovery points. |
archive_path | (empty) | No | Directory for WAL archive files on shard servers. Requires a restart to change. |
max_archive_size_mb | 10240 | Yes | Maximum total archive size in MB. Oldest archives are purged when exceeded. |
NOTEWhen PITR is disabled (
enabled = false), there is zero performance impact — no background threads, RPCs, or additional disk I/O.
Restoring to a Point in Time
To restore the database to a specific timestamp:
GQLRESTORE DATABASE AS OF TIMESTAMP '2026-02-22 14:30:00'
The timestamp format is YYYY-MM-DD HH:MM:SS. This statement runs asynchronously and returns a job_id that you can monitor.
The restore process:
- Finds the nearest recovery point at or before the target timestamp.
- Locates the most recent base backup before the target.
- Restores each shard from the base backup.
- Replays archived WAL files up to the target sequence number.
- Resumes normal cluster operation.
Prerequisites:
- PITR must be enabled (
[PITR] enabled = true). - At least one recovery point must exist.
- A base backup (created via
CREATE BACKUP) must exist before the target timestamp.
The PITR_RESTORE system privilege is required to execute PITR restore. The root user has this privilege by default.
PITR Limitations
- The finest recovery granularity is determined by the
barrier_interval_ssetting (default 60 seconds). - PITR restore is a cluster-wide operation that affects all graphs and all shards simultaneously.
- A base backup must exist before the target timestamp.
- The
archive_pathcannot be changed at runtime; a server restart is required. - WAL archiving is paused when disk usage reaches the HIGH or CRITICAL level. Recovery points created during this period may have incomplete WAL coverage.